
There’s something magical about a perfectly executed New York cheesecake. That first forkful—dense yet somehow light, rich yet delicate, with a gentle tang that balances the sweetness. I’ve spent years perfecting my technique, and today I’m sharing everything I know about creating the quintessential New York cheesecake that will transport you straight to a classic Manhattan deli.
Growing up in a family of passionate bakers, I learned that cheesecake isn’t just dessert—it’s an art form. My grandmother’s recipe box contained no fewer than seven different cheesecake variations, but her classic New York-style remained the crown jewel. After inheriting her recipes and spending countless hours experimenting in my own kitchen, I’ve crafted what I believe is the perfect balance of traditional technique and modern know-how.
The Origin Story: New York Cheesecake’s Rich History
Before diving into my recipe, let’s appreciate where this iconic dessert came from. While cheesecake itself dates back to ancient Greece, the New York version we know today emerged in the early 20th century.
The game-changer was a German immigrant named Arnold Reuben (yes, of Reuben sandwich fame). In 1929, Reuben was served a cheese pie at a dinner party and became obsessed with creating his own version. His experimentation led to the dense, cream-cheese-forward cake that would become the standard for New York cheesecake.
What sets a true New York cheesecake apart is its simplicity—cream cheese, eggs, sugar, and a touch of vanilla, baked atop a simple graham cracker crust. No water bath, no fancy flavorings—just pure, unadulterated cheesecake perfection.
Essential Ingredients: Quality Matters
I’ve learned through countless trials that with so few ingredients, quality becomes paramount. Here’s what you’ll need:
For the Crust
- 2 cups graham cracker crumbs (about 15-16 full sheets)
- 1/3 cup granulated sugar
- 1/2 cup unsalted butter, melted
- Pinch of salt
For the Filling
- 5 blocks (8 oz each) full-fat cream cheese, room temperature
- 1 3/4 cups granulated sugar
- 3 tablespoons all-purpose flour
- 5 large eggs, room temperature
- 2 large egg yolks, room temperature
- 1/4 cup heavy cream
- 1 tablespoon pure vanilla extract
- Zest of one lemon (optional, but authentic)
Key Ingredient Notes:
Cream cheese: Philadelphia brand is traditional and what I always use. The blocks should be completely softened—I leave mine out for at least 4 hours before baking.
Eggs: Farm-fresh eggs with vibrant yolks will give your cheesecake that characteristic golden hue.
Vanilla: Use pure vanilla extract, not imitation. For an extra-special touch, I sometimes use vanilla bean paste.
Equipment Essentials
The right tools make all the difference:
- 9-inch springform pan (3 inches deep)
- Stand mixer with paddle attachment
- Measuring cups and spoons
- Rubber spatula
- Cooling rack
- Heavy-duty aluminum foil
- Food processor (for graham crackers)
The Technique: Achieving Cheesecake Perfection
After making hundreds of cheesecakes, I’ve identified the critical steps that make the difference between good and transcendent:
Step 1: Prepare Your Ingredients
Everything must be at room temperature—this isn’t optional. Cold cream cheese will create lumps that never fully incorporate.
Step 2: Perfect Your Crust
- Preheat oven to 350°F (175°C)
- Mix graham cracker crumbs, sugar, and salt in a bowl
- Stir in melted butter until mixture resembles wet sand
- Press firmly into the bottom and 1 inch up the sides of your springform pan
- Bake for 10 minutes, then cool completely
Step 3: Master the Filling
- Reduce oven temperature to 325°F (165°C)
- Beat cream cheese and sugar at medium-low speed until completely smooth, about 4-5 minutes
- Mix in flour until incorporated
- Add eggs one at a time, mixing just until each is incorporated
- Mix in egg yolks, cream, vanilla, and lemon zest (if using) at low speed
- Pour filling over cooled crust
Step 4: Bake With Precision
- Wrap the outside of your springform pan with heavy-duty aluminum foil
- Place in a larger roasting pan
- Fill roasting pan with hot water halfway up the sides of the springform pan
- Bake for 1 hour and 15 minutes, or until edges are set but center still has a slight jiggle
- Turn off oven, crack the door open, and let cheesecake cool in oven for 1 hour
Step 5: The Crucial Cool-Down
- Remove from oven and water bath
- Run a thin knife around the edges to prevent cracking
- Cool on a rack for 2 hours at room temperature
- Refrigerate for at least 8 hours, preferably overnight
Troubleshooting Common Cheesecake Problems
After years of both triumphs and disasters, I’ve compiled this table of common issues and their solutions:
| Problem | Likely Cause | Solution |
|---|---|---|
| Cracked top | Overbaking or rapid temperature change | Use water bath; cool gradually in turned-off oven |
| Lumpy texture | Cold ingredients or overmixing | Ensure room temperature ingredients; mix on low speed |
| Soggy crust | Water leakage from bath | Double-wrap pan in heavy-duty foil; consider using oven bags |
| Sunken center | Underbaking | Bake until edges are set but center jiggles slightly |
| Browned top | Oven too hot | Bake at 325°F; use middle rack position |
| Dense, heavy texture | Overbeating after adding eggs | Mix just until incorporated after adding eggs |
| Custard-like texture | Wrong ratio of eggs to cream cheese | Follow recipe precisely; measure carefully |
| Stuck to pan | Improper cooling | Cool in oven; run knife around edge while warm |
Next-Level Variations: Building on Tradition
While I’m a purist at heart, these variations honor the classic while offering something special:
Lemon New York Cheesecake
Add the zest of two lemons and 2 tablespoons of fresh lemon juice to the filling for a bright, citrusy version.
Marble Chocolate Cheesecake
Melt 8 oz of bittersweet chocolate and mix with 1 cup of the cheesecake batter. After pouring the plain batter into the crust, dollop the chocolate mixture on top and swirl with a knife.
Black Forest Cheesecake
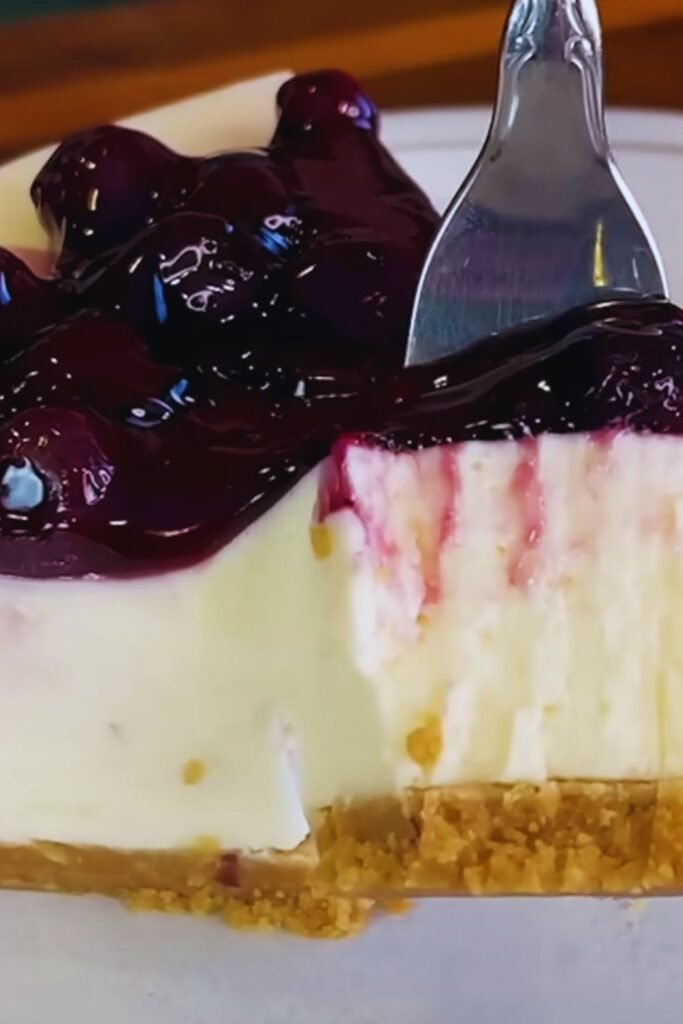
Top the finished cheesecake with cherry compote and chocolate shavings for a sophisticated take on the classic cake.
Serving Suggestions: The Final Touch
A true New York cheesecake needs little embellishment, but these serving ideas can elevate the experience:
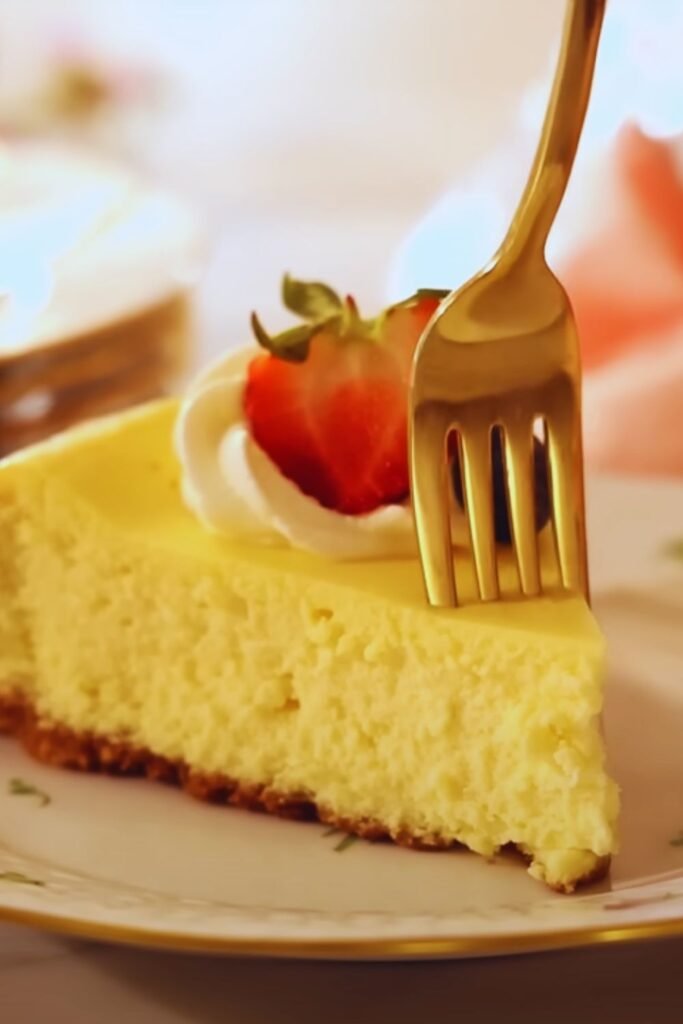
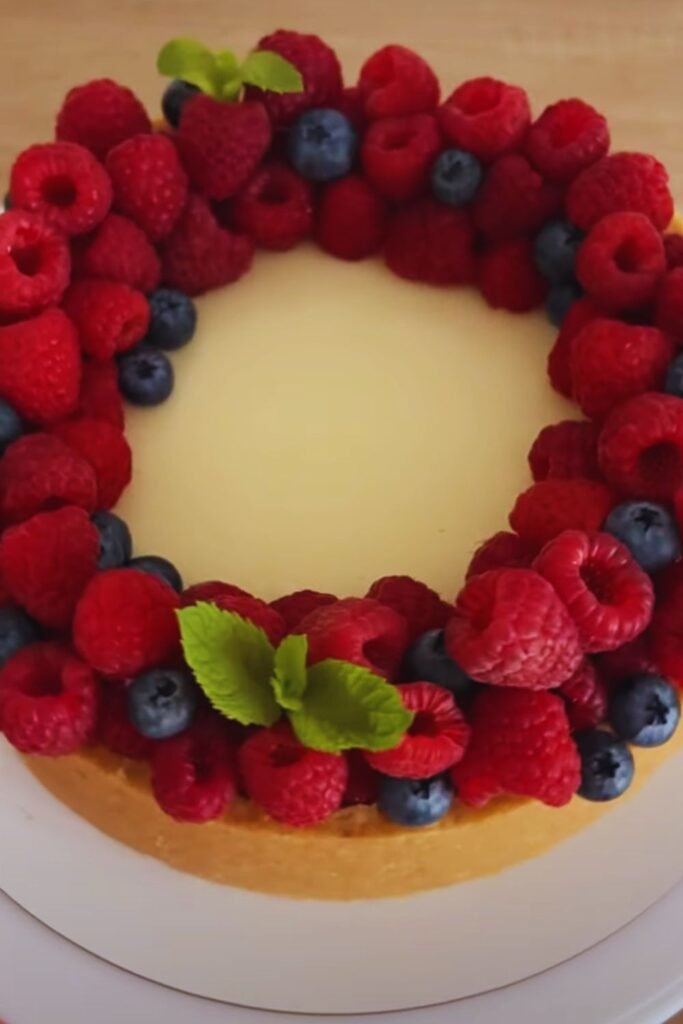
- Fresh seasonal berries—strawberries, blueberries, or raspberries
- Homemade caramel sauce drizzled lightly over each slice
- Hot espresso or coffee served alongside
- A dollop of lightly sweetened whipped cream
- Mint leaves for a pop of color and freshness
I recommend serving cheesecake slightly chilled but not cold—about 30 minutes out of the refrigerator gives the perfect texture and allows the flavors to fully bloom.
Nutritional Information
For those tracking their indulgences, here’s what you’re looking at per slice (assuming 12 slices per cake):
| Nutrient | Amount per Serving |
|---|---|
| Calories | 460 |
| Total Fat | 32g |
| Saturated Fat | 18g |
| Cholesterol | 165mg |
| Sodium | 320mg |
| Total Carbohydrates | 38g |
| Dietary Fiber | 0.5g |
| Sugars | 31g |
| Protein | 8g |
| Calcium | 100mg |
| Iron | 1mg |
Storage and Make-Ahead Tips
One of the joys of cheesecake is how well it keeps:
- Refrigerator: Tightly wrapped, your cheesecake will keep for up to 5 days.
- Freezer: Wrap individual slices in plastic wrap, then foil, and freeze for up to 2 months.
- Make-ahead: This is the perfect dessert to prepare 1-2 days before serving, as the flavors actually improve with time.
Expert Tips from My Kitchen to Yours
After countless cheesecakes, here are the insider tips that have made the biggest difference in my baking:
- The paddle attachment, not the whisk, is essential for properly mixing cheesecake batter
- Scrape down the bowl and paddle frequently—at least 4-5 times during mixing
- For perfectly clean slices, dip your knife in hot water and wipe clean between cuts
- For a darker, more aromatic crust, brown your butter before mixing with graham crackers
- If your cream cheese isn’t soft enough, unwrap it and microwave in 10-second bursts
- Detecting doneness: the center 2-3 inches should wobble slightly when gently shaken
Why New York Cheesecake Deserves Its Legendary Status
In a world of trendy desserts that come and go, the classic New York cheesecake remains a testament to the beauty of simplicity. Unlike its Italian and French cousins, the New York version doesn’t rely on ricotta or incorporate fancy techniques—it lets the cream cheese shine in all its glory.
What I’ve come to appreciate most is how this dessert connects generations. When I serve my grandmother’s recipe at family gatherings, it bridges decades and creates a moment of shared pleasure that transcends time. There’s something profound about that continuity, about maintaining a tradition while making it your own.
Questions & Answers
What’s the difference between New York cheesecake and regular cheesecake?
New York cheesecake is distinguished by its use of heavy cream and extra egg yolks, creating a denser, richer texture than other varieties. It also typically contains a small amount of lemon for brightness, though the dominant flavor is pure cream cheese.
Can I make this without a springform pan?
While a springform pan is traditional, you can use a deep 9-inch cake pan lined with parchment paper with enough overhang to lift the cheesecake out after cooling. The presentation won’t be as clean, but the taste will be identical.
Why did my cheesecake crack even though I used a water bath?
Cracking can still occur if the cheesecake cools too quickly. Make sure you’re leaving it in the turned-off oven with the door cracked for a full hour before bringing it to room temperature.
How do I know when my cheesecake is done without overbaking it?
The perfect cheesecake should have a 2-3 inch wobbly center when gently shaken. The edges should be just set and slightly puffed. Remember, it will continue cooking as it cools in the turned-off oven.
Can I use low-fat cream cheese?
I strongly advise against it. Low-fat cream cheese contains more water and stabilizers that affect both texture and flavor. If calorie concerns are driving this question, I’d suggest enjoying a smaller slice of the real thing rather than a compromised version.
How far in advance can I make this for a special occasion?
This cheesecake is at its peak 24-48 hours after baking, making it perfect for preparing 1-2 days before your event. Store it covered in the refrigerator until about 30 minutes before serving.
A Final Note: The Joy of Patience
If there’s one thing I’ve learned from baking countless New York cheesecakes, it’s that patience is the secret ingredient. From allowing ingredients to reach room temperature to the slow mixing process, from the gentle baking to the overnight chill—each step requires you to slow down and respect the process.
In our rushed world, there’s something deeply satisfying about a dessert that cannot be hurried. Perhaps that’s why, despite all the culinary trends that come and go, the classic New York cheesecake remains timeless—it reminds us that some pleasures are worth waiting for.
The next time you serve this cheesecake to friends or family, notice how conversation slows down with that first bite. In that moment of collective appreciation, you’ll understand why this dessert has endured for nearly a century and will continue to delight for generations to come.