Have you ever found yourself craving cheesecake but didn’t want to commit to making an entire 9-inch cake? That’s where these adorable and delicious mini cheesecakes come to the rescue! I’ve been perfecting this recipe for years, and I’m excited to share my foolproof method for creating these bite-sized treats that are perfect for any occasion.
Mini cheesecakes are not only easier to make than their full-sized counterparts, but they also eliminate the need for fussy water baths and reduce the risk of cracks forming on top. Plus, the individual portions make serving a breeze, especially for gatherings where guests can simply grab their own perfect little dessert.
In this article, I’ll walk you through everything you need to know to create these creamy, dreamy treats from scratch. From the perfectly crunchy graham cracker crust to the silky smooth filling and creative topping ideas, you’ll be making restaurant-quality mini cheesecakes in no time.
The Perfect Mini Cheesecake Base
The foundation of any great cheesecake is its crust, and these mini versions are no exception. A well-made crust should be firm enough to hold the filling but tender enough to cut through easily with a fork.
Graham Cracker Crust Ingredients
- 1½ cups graham cracker crumbs (about 12 full sheet graham crackers)
- 3 tablespoons granulated sugar
- 5 tablespoons unsalted butter, melted
- Pinch of salt
I like to add a touch of cinnamon to my graham cracker crust for an extra layer of flavor—just a quarter teaspoon is enough to make a noticeable difference. For those looking to experiment, you can swap the graham crackers for vanilla wafers, chocolate cookies, or even gingersnaps for a unique twist.
The Perfect Crust Method
- Preheat your oven to 325°F (165°C) and line a standard muffin tin with 12 cupcake liners.
- In a food processor, pulse graham crackers until finely ground. If you don’t have a food processor, place crackers in a ziplock bag and crush them with a rolling pin.
- Transfer the crumbs to a medium bowl and stir in sugar and salt.
- Pour in melted butter and mix until the crumbs are evenly moistened.
- Divide the mixture among the cupcake liners (about 1 tablespoon in each) and press firmly into the bottom using the back of a measuring spoon.
- Bake the crusts for 5 minutes, then remove from the oven and let cool while you prepare the filling.
A common mistake I used to make was not compacting the crust enough. For the best results, use something with a flat bottom to really press the crumbs down firmly—a shot glass or the bottom of a measuring spoon works perfectly.
The Creamy Cheesecake Filling
The true star of any cheesecake is its filling—it should be creamy, tangy, and melt-in-your-mouth smooth. The secret to achieving this luxurious texture lies in both the ingredients and the technique.
Key Filling Ingredients
- 16 ounces (2 blocks) cream cheese, softened to room temperature
- ½ cup granulated sugar
- 2 large eggs, at room temperature
- ¼ cup sour cream, at room temperature
- 1 teaspoon pure vanilla extract
- 1 tablespoon fresh lemon juice (optional, but adds nice brightness)
- 2 teaspoons all-purpose flour (helps prevent cracking)
Mixing the Perfect Filling
The most crucial aspect of making cheesecake filling is avoiding overbeating, which introduces too much air and can lead to cracks. Here’s my foolproof method:
- In a large bowl, beat the softened cream cheese on medium-low speed until completely smooth, about 2 minutes.
- Add the sugar and beat until just combined.
- Add the eggs one at a time, beating on low speed after each addition until just incorporated.
- Beat in the sour cream, vanilla extract, and lemon juice on low speed until smooth.
- Sprinkle the flour over the mixture and gently fold it in using a rubber spatula.
Temperature matters tremendously when making cheesecake. All your dairy ingredients should be at room temperature to ensure they blend smoothly without lumps. I typically set mine out about an hour before I plan to start baking.
Filling and Baking Tips
- Fill each liner with filling until about ¾ full (approximately 3 tablespoons of filling per cup).
- Tap the pan gently on the countertop a few times to release any air bubbles.
- Bake at 325°F (165°C) for 17-20 minutes, or until the centers are almost set but still slightly jiggly.
- Allow to cool in the pan for 30 minutes, then transfer to a wire rack to cool completely.
- Refrigerate for at least 3 hours or overnight for the best texture and flavor.
One of my favorite tricks is to turn off the oven when the cheesecakes are almost done, crack the door open, and let them cool slowly for about 10 minutes before removing them. This gentle temperature change helps prevent the sudden contraction that can cause cracks.
Troubleshooting Common Cheesecake Problems
Even experienced bakers occasionally run into issues when making cheesecakes. Here’s how to troubleshoot the most common problems:
| Problem | Possible Causes | Solutions |
|---|---|---|
| Cracked tops | Overmixing the batter | Mix on low speed just until ingredients are combined |
| Baking at too high a temperature | Ensure oven is calibrated correctly and bake at 325°F | |
| Cooling too quickly | Allow to cool gradually in the oven with door ajar | |
| Lumpy filling | Cold cream cheese | Ensure all dairy ingredients are at room temperature |
| Insufficient mixing of cream cheese | Beat cream cheese alone until completely smooth before adding other ingredients | |
| Soggy crust | Not pre-baking the crust | Always pre-bake for 5 minutes |
| Too much butter in crust mixture | Follow the ratio of 1½ cups crumbs to 5 tablespoons butter | |
| Cheesecakes sink in the middle | Opening the oven door during baking | Resist the urge to peek until baking is almost complete |
| Underbaking | Look for slightly jiggly centers that will set as they cool | |
| Sticking to liners | Removing from liners while still warm | Ensure cheesecakes are completely chilled before removing wrappers |
| Low-quality liners | Use higher quality, preferably non-stick, cupcake liners |
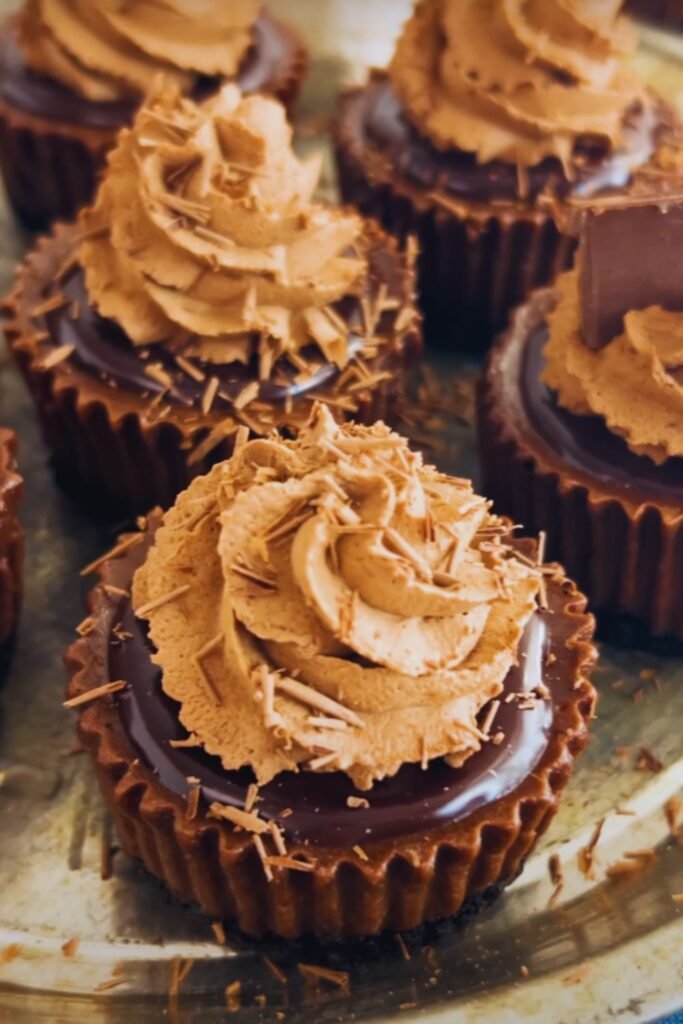
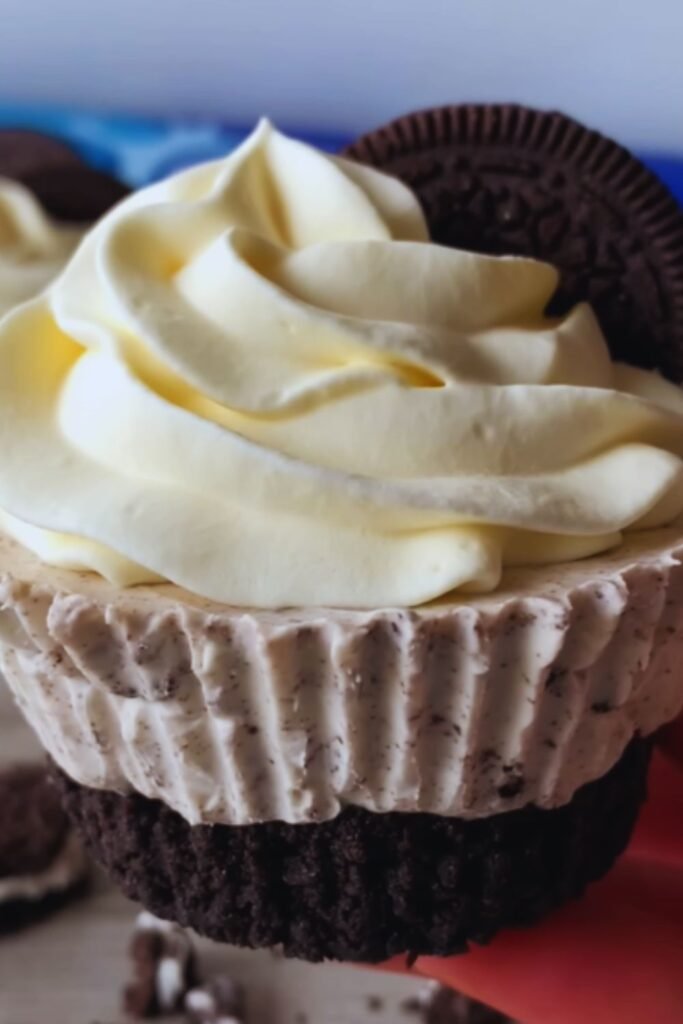
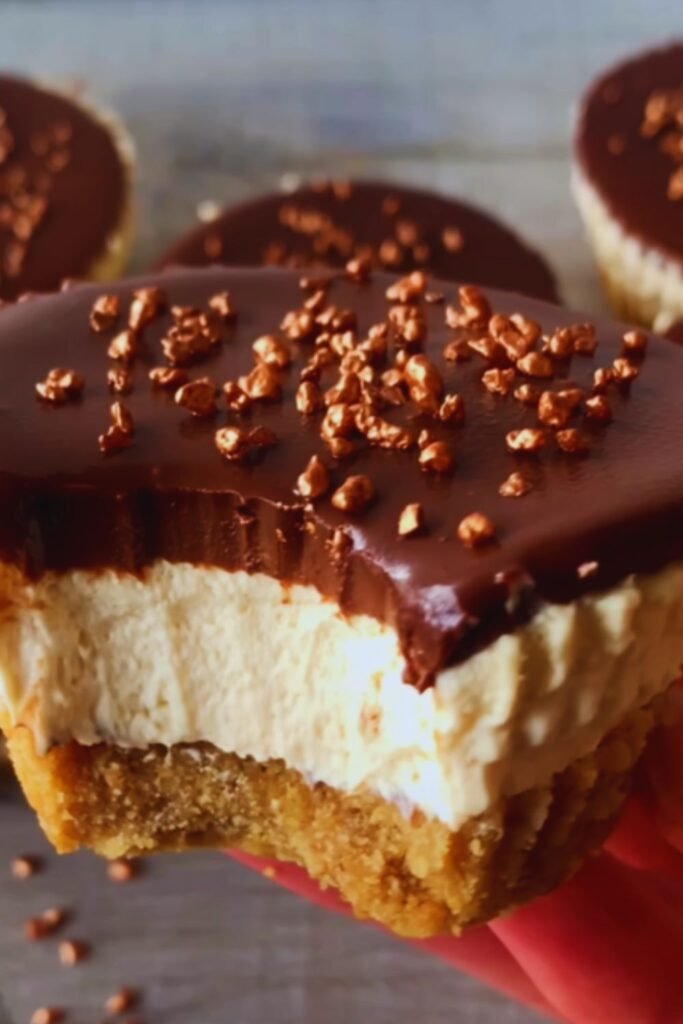
Creative Topping Ideas
While these mini cheesecakes are absolutely delicious plain, toppings can elevate them to the next level, adding flavor contrast, visual appeal, and a personalized touch.
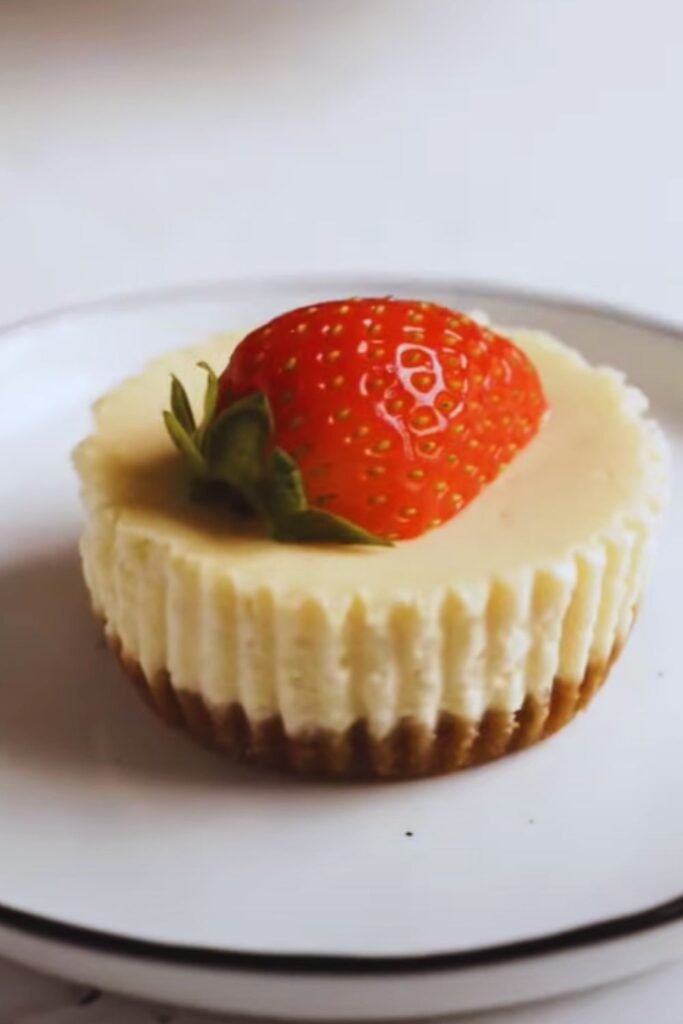
Fruit Toppings
Fresh fruit toppings add a burst of color and provide a tangy counterpoint to the rich cheesecake filling. Here are some of my favorites:
- Fresh berries (strawberries, blueberries, raspberries)
- Fruit compotes or preserves
- Sliced peaches or nectarines (when in season)
- Caramelized bananas
- Citrus segments (particularly lovely with a sprinkle of zest)
For a glossy, professional finish, brush fruit toppings with a thin layer of melted apricot jam.
Sweet Sauces and Drizzles
A drizzle of sauce can transform a simple mini cheesecake into a decadent dessert:
- Classic cherry sauce
- Salted caramel sauce
- Chocolate ganache
- White chocolate drizzle
- Dulce de leche
- Lemon curd
Apply sauces just before serving to maintain the cheesecake’s clean appearance and prevent the topping from soaking into the filling.
Crunchy Elements
Adding texture creates an irresistible contrast with the creamy cheesecake:
- Toasted chopped nuts (pecans, walnuts, pistachios)
- Chocolate shavings or curls
- Crushed cookies or brittle
- Toasted coconut flakes
- Caramelized sugar shards
I love combining multiple elements for show-stopping desserts, such as pairing fresh raspberries with a chocolate drizzle and a sprinkle of chopped pistachios.
Flavor Variations
One of the joys of making mini cheesecakes is how easily you can customize the flavor. Here are some of my tested variations that always impress:
Chocolate Mini Cheesecakes
Add ¼ cup unsweetened cocoa powder and an additional 2 tablespoons of sugar to the filling. For deep chocolate flavor, add ½ cup of melted and cooled semi-sweet chocolate.
Lemon Mini Cheesecakes
Increase lemon juice to 2 tablespoons and add 1 tablespoon of lemon zest to the filling for a bright, citrusy flavor. Top with lemon curd for extra zing.
Marble Mini Cheesecakes
Prepare the basic filling, then remove ¼ of the batter and mix with 2 tablespoons of melted chocolate. Drop spoonfuls of chocolate batter onto the regular batter and swirl with a toothpick.
Pumpkin Spice Mini Cheesecakes
Replace ¼ cup of the cream cheese with ⅓ cup pumpkin puree and add 1 teaspoon of pumpkin pie spice. These are perfect for fall gatherings!
Coffee Mini Cheesecakes
Dissolve 1 tablespoon of instant espresso powder in 1 tablespoon of hot water, let cool slightly, then add to the filling. The coffee flavor wonderfully complements the tangy cream cheese.
Make-Ahead and Storage Tips
Mini cheesecakes are perfect for making ahead of time, which makes them ideal for entertaining or meal prep.
Refrigerator Storage
Properly stored in an airtight container, mini cheesecakes will keep in the refrigerator for up to 5 days. For the best flavor and texture, I recommend adding toppings just before serving.
Freezer Storage
For longer storage, mini cheesecakes freeze beautifully:
- Allow the cheesecakes to cool completely.
- Place them on a baking sheet and freeze until solid (about 1-2 hours).
- Wrap each cheesecake individually in plastic wrap, then place in a freezer-safe container or zip-top bag.
- Freeze for up to 3 months.
- To thaw, place in the refrigerator overnight or at room temperature for about 30 minutes.
I often make a double batch and freeze half for last-minute dessert emergencies!
Serving Suggestions
These mini cheesecakes are versatile enough to fit any occasion, from casual family dinners to elegant dinner parties.
Casual Gatherings
- Create a mini cheesecake bar with various toppings in small bowls, allowing guests to customize their own desserts.
- Serve alongside coffee, tea, or hot chocolate for a cozy dessert experience.
- Pair with fresh fruit for a lighter dessert option.
Elegant Entertaining
- Place each mini cheesecake on a small dessert plate with a drizzle of sauce in an artistic pattern.
- Garnish with edible flowers or gold leaf for an upscale presentation.
- Serve with a small scoop of complementary sorbet on the side.
Special Occasions
For holidays and celebrations, theme your mini cheesecakes accordingly:
- Valentine’s Day: Top with heart-shaped strawberry slices and a white chocolate drizzle
- Independence Day: Decorate with blueberries and strawberries for a red, white, and blue theme
- Thanksgiving: Pumpkin variation with spiced whipped cream
- Christmas: Peppermint cheesecakes with crushed candy cane topping
Mini Cheesecake Nutritional Information
While cheesecake is undeniably an indulgence, the mini size helps with portion control. Here’s the approximate nutritional breakdown for one plain mini cheesecake (without toppings):
| Nutrient | Amount per Serving |
|---|---|
| Calories | 275 |
| Total Fat | 19g |
| Saturated Fat | 11g |
| Cholesterol | 95mg |
| Sodium | 200mg |
| Total Carbohydrates | 22g |
| Dietary Fiber | 0.5g |
| Sugars | 17g |
| Protein | 5g |
For those with dietary restrictions, consider these modifications:
- Lower sugar: Reduce sugar to ⅓ cup and use a graham cracker crust without added sugar
- Gluten-free: Use gluten-free graham crackers for the crust and ensure your flour is gluten-free
- Lower fat: Use Neufchâtel cheese (⅓ less fat than regular cream cheese) and low-fat sour cream
Questions and Answers
Q: Can I make these mini cheesecakes without a muffin tin?
Yes! You can use specialized mini cheesecake pans with removable bottoms for an even more professional look. Alternatively, use silicone muffin cups placed on a baking sheet—they’re flexible and make removing the cheesecakes much easier.
Q: My cream cheese seems lumpy even after beating. What am I doing wrong?
The most common cause is cold cream cheese. Make sure it’s truly at room temperature—this means leaving it out for at least an hour. If you’re in a rush, cut the cream cheese into small cubes to speed up the warming process, but never microwave it, as this can cook parts of the cheese.
Q: How can I tell when my mini cheesecakes are done baking?
The centers should be mostly set but still slightly jiggly when you gently shake the pan. If they’re completely firm, they’re overbaked. The edges might be slightly puffed, but the centers should still look a bit soft—they’ll continue to set as they cool.
Q: Can I substitute Greek yogurt for sour cream?
Absolutely! Full-fat Greek yogurt makes an excellent one-to-one substitute for sour cream in this recipe. It provides a similar tangy flavor and creamy texture, with a bit more protein.
Q: Why did my cheesecakes sink in the middle after cooling?
Some settling is normal, and actually creates a perfect little well for toppings. Excessive sinking might mean they were underbaked or that the oven temperature was too high. Using an oven thermometer can help ensure your oven is running at the correct temperature.
Q: Can I make these without a stand mixer or hand mixer?
While it’s more challenging, you can make these with a lot of elbow grease and patience. Make sure your cream cheese is very soft, and use a wooden spoon to beat it until completely smooth before adding other ingredients. Be prepared for a workout!
Final Tips for Perfect Mini Cheesecakes Every Time
After years of making these delightful treats, I’ve collected some final wisdom to share:
- Quality matters—especially with the cream cheese. Philadelphia brand consistently performs well, but any full-fat cream cheese will work.
- Patience is key! Don’t rush the chilling process, as proper refrigeration is essential for the perfect texture and easy removal from the liners.
- For perfectly clean slices when cutting mini cheesecakes in half, dip your knife in hot water and wipe it clean between cuts.
- If you’re making these for a special occasion, bake a few extra. They’re irresistible, and having backups has saved me more than once!
- Trust your instincts. Baking times can vary based on your oven, so start checking a few minutes early and look for that slightly jiggly center.
These mini cheesecakes have become my signature dessert at gatherings, and I’m constantly asked for the recipe. There’s something magical about the perfect balance of creamy filling and crunchy crust, all in an adorable individual portion. Whether you’re a seasoned baker or just starting out, I hope this recipe brings you as much joy as it has brought me and my loved ones over the years.
Happy baking!